Working with clients with hundreds of thousands of pages on their website is a cumbersome task to keep on top of; Ensuring that your analytics code, be it Google Analytics, CoreMetrics or any other analytics package, is present on on every page is another thing entirely.
During a project I encountered the possibility that Google Analytics was not installed on every page of a client’s website. Unfortunately, the solution I previously relied on (SiteScanGA) is no longer available and whilst there are great tools out there for checking if GA is installed on an individual page (e.g. GA? For Firefox) there is not an easy, non-enterprise way to check if Google Analytics is installed on every page.
Thankfully there is a solution to this problem by using Screaming Frog’s SEO Spider, Excel and a little jiggery-pokery.
Setting up Screaming Frog
By default, Screaming Frog allows you to search for custom variables and you can easily check if a page does not contain your analytics code.
Before you start a crawl with Screaming Frog, you’ll need to add a custom filter.
- Go to Configuration -> Custom
- In the box for Filter 1 paste your UA code and select Does Not Contain
- In the box for Filter 2 paste your UA code and select Contains
NB. Filter 2 is required for Excel filtering method later in this article.)
Now you are free to start the crawl on the domain name you want to check. For the purposes of this How-To, I’ve used my own website as an example.
Exporting the Data
Once the scan is finished, you can now click on the Custom tab on the right hand side and you should be able to see a list of pages that do not contain your Google Analytics code.
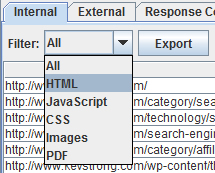
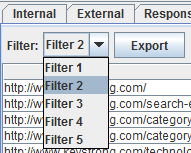
To export your data, ensure the export filter is set to Filter 1, export and save the custom_filter_1.csv file.
And that’s it; you now have all the data you need to check if Google Analytics is installed on every page of your website.
Checking Which Pages Are Missing Google Analytics with Excel
If you want to create a list of all pages on your website and filter them accordingly depending on whether Google Analytics is installed or not, I have created a custom Excel document that should make it easier for you to analyse the information from Screaming Frog. Download the Pages Missing Google Analytics Excel workbook, and using the following instructions you should be able to create an actionable list of all pages to send to your web developers to rectify the problem of pages missing Google Analytics.
Exporting Your Data
If you had setup Screaming Frog with both filters in place, then you already have your data. If that is not the case, you will have to add the second filter and run the scan again (sorry).
Once you have your data, you will need to export the right data. This is achieved in two stages within Screaming Frog.
Firstly, whilst in the internal tab, change the export filter to HTML, export and save internal_html.csv file.
Secondly, go to the Custom Tab and whilst ensuring the export filter is set to Filter 2, export and save the custom_filter_2.csv file
Importing Your Data
Using both of the files exported from Screaming Frog, we can start to import the data. The instructions make the process seem quite lengthy, but trust me, it’s not. In less than a minute you will have a fully functioning filtered list of pages with Google Analytics status.
Internal HTML
Firstly open internal_html.csv. We need to copy & paste the data from this file into our workbook. To do this simply:
- Click in the first cell A1 in your internal_html.csv file
- Either Press CTRL + A to select all.
- Then press CTRL + C to copy.
- Go to the Pages Missing Google Analytics Excel workbook and click on the “Internal HTML” tab.
- Click in cell A1
- Press CTRL + V to paste.
Pages Containing Analytics
Secondly open custom_filter_2.csv. Again, we need to copy & paste the data from this file into our workbook. To do this simply:
- Click in the first cell A1 in your custom_filter_2.csv file.
- Either Press CTRL + A to select all.
- Then press CTRL + C to copy.
- Go to the Pages Missing Google Analytics Excel workbook and click on the “Pages Containing Analytics” tab.
- Click in cell A1
- Press CTRL + V to paste.
Sorting Your Data
Now we have the data in place, click on the “Pages with No GA” tab and press F9. This calculates formulas just in case Microsoft Excel has them turned off by default.
Now, you should have a list of pages in a filtered list allowing you to sort by whether Google Analytics is in fact installed or not.
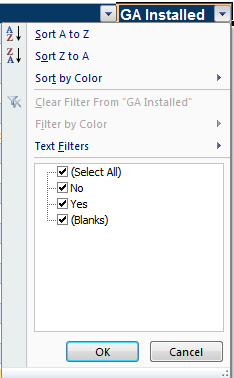
Click the Drop down arrow on GA installed and select/deselect what you want to filter by.
As a side note, this workbook checks a minimum of 2,959 pages (random number ftw!). I recommend disabling “(Blanks)” in the GA Installed column to make viewing easier. Also, if you want to expand how many pages the filter contains, simply select the bottom-right corner of the table (currently cell C2965) and drag down however many more rows you need.
And that’s it; you can now take a look through the pages that are missing Google Analytics easily and on a large scale level. If you need any help with the tutorial, please feel free to contact me.
|


